Friday, 30 November 2012

How to prevent hair loss!

Hi Beauties! 

As promised that I'll do a hair care post once a week on this blog, just because I get mind block sometimes. Mind block is where I can't think of what to write at times, and this happens to most bloggers. 
So quite recently, a lot of people have been going through hair loss/hair falling so I thought it'd be a good chance to do a topic on how to prevent hair loss! 
I hope this post will be useful to all of you out there going through hair loss! 

There are different factors on why you go through hair loss, so keep reading and you'll find out! 

1) Constant heat; So too much blowing your hair dry can make you lose hair and make your hair fall, so make sure not too always blow your hair dry! 

2) Too much dyeing/highlighting; When your hair is too exposed to chemicals, this is really bad for your hair especially if you have ombre hair, where you bleach your ends to blonde to make it to a different color. 

3) Too much styling; So if you're a person who likes to tie up your hair into a bun or a pony tail then you need to know that too much pulling or tying it tightly will cause your hair to fall because of the friction. 

4) Shampoo; Avoid washing your hair every single day and also avoid rubbing your hair dry to a point where it looks frizzy. 

5) Sleep; Sleep is your best friend, sleeping will help you maintain hair loss and even if you are stress, your hair will fall quickly. 

6) Massage; Massage your scalp when you're shampoo-ing your hair for a few minutes or even when your hair is damp. This will give a good circulation in the scalp to keep your hair follicles active. You can add some lavender oil or any type of oil of your choice. 

7) Antioxidants: Apply warm green tea on your scalp and leave it for an hour then rinse! Green tea contains antioxidants which helps prevent hair loss! Try brewing two bags of green tea in one cup of water. Also if you apply the green tea bags on your under eyes, this will help remove puffiness and lighten dark circles. It's like killing two birds with one stone :) 

So i hope this post have helped you in any way, even if it's just ONE of you out there I'd be so happy. 
If you have any request you want to know about hair care, do leave it in the comment section below and I'd be sure to reply you! 
So as usual, 
I hope you all are enjoying your day and also hope you guys are blessed in every single way 
(whoa, that rhymes)

Will you take any of this tip to consideration?

xx Zoe. 

Thursday, 29 November 2012

Illusions on longer looking legs.

Hi Beauties! 

People will always look at models and think to themselves "Man, how I wish I have their longer looking legs", Look no further because here I am going to tell you how to get their long looking legs, So keep reading &You'll find out! 

Note to you; I have tried this before and it makes my leg look instant longer and thinner so  it works for me, i suggest you give it a go! 

What do you need; 

1) Highlighter (Makeup highlighter, not the highlighter you use to highlight your books) 

How it works; 

- Apply the highlighter (preferably with gold shimmer, Not glitter) on your thighs and at the back of your calfs. 
- Light reflects from it and make your legs appear thinner and longer. 

When I say apply on your thighs, I don't literally mean dump a whole lot of gunk on your thighs and calf, what I meant is that just use a blush brush and sweep it along your thighs to give it a hint of shimmer. Please do not go cover your thighs with the highlighter, just a stroke will do. 

I also use this technique on my shoulder blades and on my collar bones on night outs.  

This is also one of the reason why makeup gurus like to use shimmer in the inner corner of the eyes near the tear ducts, it's because light reflects making your eyes look bigger and more awake! 

I hope you guys enjoyed this post and I hope I've helped some of you reading this and wanting to have longer thinner looking legs! This is a pretty short post, but like they say "The shorter the better" 

More tips like these coming up! :) 
Kisses! ♥

xx Zoe (@NicholleZoe)

Wednesday, 28 November 2012

October Favorites 2012! ♥

Hi Guys! 

So you're probably wondering why am I suddenly doing a October Favorites 2012, well I decided it'd be fun just to let you all know what I have been loving from October throughout Mid November! So I guess this is a october to mid november favorites! 
These videos are super popular on YouTube so check them out! 

Makeup: 

Face

My Face-Shop BB cream. I have been using this for a year and I have absolutely fallen in love with it, i don't think there's a product that can go against it because of the texture and the way it makes me look like I have clear skin. 

Eyes

Lancome artliner in Noir; Okay, before you go all "whoa man, she spends so much money on an eyeliner", I must say I got this when they had a promotion so I didn't pay a full price just so you know. Well basically, I have very oily lids and this is not in any way waterproof but now that I have double eyelids (no I did not have surgery, let me know if you'd like to do a post on how to get double lids without surgery, No I didn't use Michelle Phan's way) it just stays on my eyes. 

Cheek; 

Shu Uemura Blush in Peach. This was a hand down from my mama, she used it twice and she did not like it at all because it was not vibrant enough. I personally go for a super soft cheek so this works absolutely well for me. 

Lips;

Dior Addict lipstick No 578. This was in fact a birthday present from my uncle and his wife so I did not spend money on it at all. I've been trying to dull the colors on my lips a little now that it's a different season, this is a dark cherry red. Not as dark as a vampy red but it's just darker than what I am used to. I know if you googled it, it looks quite pink in photos but in real life it's a cherry red which is quite dark when you pile on a lot, It's super pigmented! 

Hair; 

Free &Free Damage Aid; If you have not read my review post about this product, please do go check it out as I would not say much here. This is an amazing product for my ends because I tend to curl my hair a bit more often now. 

SD Protein Cream; I use a protein cream when my hair is still damp and before using the damage aid treatment water and this styles my hair. Ever wonder what is that cream the stylist put on your hair before you leave the salon? it's this! I got this from my stylist.


So I hope you enjoyed this little small post about the october favorites, if you'd like to see more of this kind of post please tell me in the comment section below! 
Also note that I don't spend money on makeup when I'm here, I only tend to spend a little more when I am out of country and I only buy products when I know I am absolutely going to love and tend to run out easily. 

Disclaimer; I am not affiliated with the brands mentioned above, opinions are all my own.
Follow me to keep up with the latest news! 


*hugs* 

xx Nic (@NicholleZoe) 


Tuesday, 27 November 2012

Why you shouldn't drink milk?

Hi Beauties! 

We have heard this quote many many times "You eat what you are" and I am not specifically pointing at so called "junk food", I am talking about MILK, shocking is it? 
Well a lot of people say that milk causes acne to become worse and looking more irritated. 
So today's post is to clear things up and tell you why you shouldn't drink milk! I am not saying it's entirely bad for you, but if you do drink it on a daily basis, you might want to rethink it over! So if you suffer from Acne and you've been drinking a lot  of milk lately, well this is why.

Let me clarify that not all milk will cause you to have break-out. Skim milk has said to be the type of milk that causes more breakout rather than if you take Whole milk.

How does milk contribute to acne? 

- Milk contains androgen hormones which is strongly linked to acne breakout, not only that but women produce testosterone so basically it stimulates the sebaceous glands. If you have oily skin this will create a more oilier face for you because of the blockage of pores and of course, pimples. 

The no milk diet; 

Try skipping milk for breakfast, try instead soya bean (without dairy, of course) or anything that doesn't need to do with dairy &Your skin will clear up. 
Do this for about a month and you'll see results! 

Disclaimer; All pictures are not mine unless stated to be so! 

Update; Let me clear things up okay, Not everyone will get affected and have pimples due to milk. What I meant is that if you have pimples and you drink milk, this MIGHT be the reason why. &Again, I am not a doctor or any sort, so you can either believe it or not. Hopefully this clear things up! 

Kisses! ♥

xx Nic (@NicholleZoe) 

Monday, 26 November 2012

DIY Lip Scrub.

Hi Beauties!

Winter is coming (well in most part of the world) and you need something to do with your chapped dry lips, but don't want to spend money on a good lip scrub? Well you don't have to, all the ingredients you need are in your kitchen/fridge. There are many different similar posts to this lip scrub, but if you have not checked it out yet keep reading on and find out how to make your very own lip scrub! 

Ingredients; 

1 table spoon of honey. 


1 tea spoon of sugar 


Vaseline/ lip balm. 


How to make? 

- Take a small container that can be kept in the fridge, Take 1 table spoon of honey and pour it in the container. 
- Take 1 tea spoon of sugar and mix it with the honey until well. 
- Squeeze a little of the vaseline or lip balm into the honey and sugar until you have a consistency paste. (If you don't add vaseline, the honey cannot hold the sugar resulting in the sugar left at the bottom of the container)

How to use?

- Take a small amount of the scrub and scrub it through your lips back and forth till the dead skin leaves. 
- Use a wet washcloth and wipe the scrub off (It taste good too, but don't eat it too much... it has vaseline) 
- Follow up with a good lip balm. 
I personally have different flavors of the EOS lip balm however unfortunately you can't get them here. If I'm not mistaken, they only sell this in the states. I have a friend who is kind enough to help me get them from the states! *Thank You, You know who you are :)*


So if you can't get your hands on the EOS lip balm, the other one I recommend you is using this for the lip scrub. I got to warn you that this is oily on the lips so if you don't like that, i wouldn't recommend you to get this. Get Vaseline instead! but If you do happen to get the EOS lip balm then use that daily. 

Now you have soft beautiful lips ready for the winter. I recommend doing this every single night if possible to just exfoliate off the dead skin. You don't have to do it too long, just about a minute should take off all the dead skin. 

Also remember this is the amount I make when I make the scrub, if you wish to make a little more than the amount given, just double the amount and you should be good to go! 
Make sure you use SUGAR, not SALT. Salt is too refined and too small it does not really exfoliate enough than sugar,Sugar are bigger chunks therefore exfoliates more. 

This scrub could last you about a week and it's only good for a week and a half so use it up before making a new batch. 

Disclaimer; All pictures are not mine unless stated to be so. 

Are you willing to give this scrub a try? Let me know in the comment section below! 

Happy Scrubbing! 


xx Nic (@NicholleZoe)

Sunday, 25 November 2012

10 things you need to know about a moisturizer.

Hi Beauties! 

As said in the previous post, I'll be a bit busy this weekend and some days of next week so I may or may not publish a new post a little early or a little later that 3PM so please don't upset that I published it either earlier or later in the day! 
So today, I know I wanted to do something with hair care but then I thought a topic on moisturizer was a little more important than hair care, so hair care post will maybe be up around next week or so! Sorry! 

10 things you need to know about a moisturizer 

- Every single girl should have a moisturizer that they can go to at the end of the day or even the start of the day. Moisturizer keeps a girl skin balanced and hydrated when they are dry. 
- Apply a moisturizer all around your face and PAT the product in, like a serum this works so much better than just applying it on the surface of the skin. 
- Use a moisturizer that has no SPF. 
- Find a moisturizer that doesn't contain benzyol peroxide (Acne solution) 
- Find a moisturizer that is oil free. I'm not saying find one where it's water based, just a moisturizer that doesn't feel heavy on your skin. 
- Use a moisturizer that does not only stay on your skin but goes deep into your skin. 
- Use a moisturizer that is 100% fragrance free. ( a lot of times, people get irritated with a moisturizer is because of the fragrance) 
- Use a moisturizer that does not have titanium dioxide and/or zinc oxide. (those chemical reflect light making you have a white cast)
- Use a moisturizer that does not label "tinted moisturizer". Tinted moisturizer means it contains foundation in it. 
-Use a moisturizer twice a day. 

So this post might be a little rambly and short but it's now 3AM so I am so sorry if you didn't enjoy this post.  If you have any questions or concern about this post, feel free to comment in the section below and I'll reply you all once I have the time. 

Have an amazing Sunday! 

xx Nic (@NicholleZoe) 

Saturday, 24 November 2012

Things you need to know about exfoliation.

Hi Beauties! 

Today's post will be all about exfoliating your skin! So welcome to exfoliation 101! I'm trying to alternate each different category post every day (does this make sense?) Well basically I'll post something different every day, It wouldn't be skin care the entire week then hair care the entire week. I'll try to rotate! 

So exfoliation has played a big part in my life and right now it is what made my skin get better. We shall go through the basics and at the end I'll recommend you some body product for exfoliation as well as face, so keep reading on! 

Why should we exfoliate? 
- Exfoliation means taking a dead layer of skin off your skin to make your skin brighter and more vibrant. Basically, you can't see the dead layer of skin that is on your face &body. Before you exfoliate, you'll feel as if your skin is lacking sunlight and it is becoming dull. 

How you should exfoliate? 
- There are a lot of different products out there for exfoliation, you can DIY exfoliating lip scrub or you can make your own body scrub. There are products for your skin as well and also there are jelly like texture that has a rough end to the bottom which is widely sold around korea and japan. 

When you should exfoliate? 
- I would recommend you to exfoliate every once to twice a week just to get rid of the dead skin. Don't exfoliate too much or else your skin will start to look irritated. If you're going to shave your legs, it's better to exfoliate first then only shave before you're going to shave about a little more hair than you wouldn't have shave if you haven't exfoliate (does this even make sense?) 

So now moving on, I'll give you some products that helped me with exfoliation and also a little mini review right below it. 

Face products; 

LUSH Angels On Bare Skin 


Mini Review; This product works as an all in one cleanser, this exfoliates really well and it consist of ground almonds which removes dead skin. If you have normal skin and you're not acne prone or you don't have problematic skin, you could probably get away with just this as your cleanser. I use this as my cleanser and scrub so i don't need to use a separate cleanser. 

ST Ives Apricot Scrub. 


Mini Review; I am not going to lie I haven't tried this product out yet, but I have heard so many good comments about this product that I have been trying to get my hands on it but they were sold out here in the drugstores. So if you already have your hands on it, please tell me how it is &I'll update this little review! 

Toothbrush method 

Mini Review; If you haven't already checked out my first and ever post on this blog click here ! What better way to invest in a good electric toothbrush that you can not only brush your teeth with but exfoliate your skin as well? well of course with a different brush! Electric toothbrush comes with an extra brush! This has by far been my favorite method of exfoliation, so give it a try! But please do read my warnings in the post before trying. 

Bath products; 

LUSH Aqua Mirabilis 


Mini Review; This comes in a solid little exfoliating bar and also it is a lotion. What I do is that I wet my arm or my legs if I am going to exfoliate and when the product comes in contact with water it turns into a milky feel which then sips through your skin and leave your skin feeling soft! Absolutely amazing product, thank you lush! 

Updated; Comment from Amanda Ting.

LUSH's Buffy

Mini Review; It's like an exfoliating body butter, similar to Aqua Mirabilis. And Buffy is really really amazing! Cause it's very moisturizing and yet at the same time, you get a good scrub! :D


I admit, I don't use that many bath products which contains exfoliating properties, so if you have any good recommendations, I'll be gladly to update and mention your name! 
So this was my post on exfoliation, I am sorry if it was kind of rambly because it's now 3AM and I have just finished working on this post! *YAYY for the hard work

I have tried all the products mentioned above, and I still have them in my bathroom. So if you'll like to know more about how it works or where you can get them, feel free to leave a comment in the comment section below!

Disclaimer; As usual, pictures are not mine unless stated to be so. 

Hope you guys are having an amazing weekend! 

xx Nic (@NicholleZoe) 

Friday, 23 November 2012

All you need to know about BB creams.

Hi Beauties!


As said in the previous post where I inserted "update" at the end of the post where I said I'll make this blog more into a beauty blog which means it consist of skin care, hair care and beauty care (makeup, product review blablabla). So I thought it'd be fun for a change! *Yayy-Applause
Also, if you guys are a daily reader on my blog I'd like to take this opportunity to thank you guys so much for reading :*

Okay, let's get on with this post! So basically I am obsessed with BB cream's because that's what i always use and I personally don't have perfect skin so BB cream is like a very thin cover over my skin (yes, you can still see blemishes)

What are BB creams? 

- Well, BB cream stands for Blemish Balm and what it does is that it is a moisturizer, sunscreen and a thin foundation (not technically a foundation but it's still considered). It makes your skin look dewy and polished, Some bb cream makes your skin look shiny so I'd set it with powder. 

How does it look like? 

- It comes in a bottle and it is mixed with the sunscreen and moisturizer, so basically it's just a little bottle that looks like a foundation but rather than being labelled as a foundation, it's labelled as a BB cream. So it comes with a little pump on the top where you pump the product out. 

Okay, I know it's a bit confusing to see with the wallpaper and all but I'm working on it!! It looked fine on camera :( boo. 
Look!! I have a new background for my pictures. Yayy! Please give me credit guys... hahaha moving on
How do I use it? 

- I take about 1 pump of the BB cream (sometimes less, because my skin has cleared up now) then I dot it on my face (cheek, forehead and chin) then I blend it out with a stippling brush. The reason why you need to use a stippling brush for a bb cream is because this creates airbrush look, however I must warn you guys that it might give you streaky brush marks so use a sponge and blend it away. 

Why I like it? 

- Well, on days when I'm running late and as a girl I have to slap on a ton of moisturizer (Yes, even if you have oily skin) and all my skin care products, so I get lazy from time to time (not everyday). BB cream is also a moisturizer and a sunscreen (sunscreen is important! If you haven't already check it out, click Here
BB cream gives me a very even coverage, it is super light so you don't have to worry about it being heavy on your skin and all sort, well my bb cream doesn't do that. 

How expensive is it?

- It varies from brand to brand. I use Face-Shop's BB cream which is a korean based brand and to be honest it's pretty pricey, but I've been using it for a year and it's still going strong! I prefer to invest and splurge my money on skin care products and BB cream, the others I go cheapskate on. *insert laugh* 

How good of a coverage is it?

-Well in the picture below I have applied a little on my knee area (yes, my knee area. The pictures came up better when I applied it on my knee area) just to show you how good the coverage is so in number 1, is how it looks like when it comes out of the bottle and number 2 stated shows where I've blend it out. 
Number 1

Number 2
Look at how even the blending is and also how sheer of a bb cream it is! 

So I hope you guys enjoyed this post and also if you have questions about BB creams please feel free to comment in the comment section below and I'd be happy to reply you! So do leave comments below, I love checking back in and finding comments that needs to be replied! 

P.S: Also, I'm going to be a bit busy this weekend and some days next week, so I might publish my next post a little later than 3PM. So please don't send me hate messages saying I'm not following the exact time and what not (hahaha) I'm kidding! But if you follow me you'll know when I am publishing my next post! 


Disclaimer; All pictures are mine and I am not affiliated with the brand mentioned above. All opinions are solely based on my own. 

TGIF! 
What are you going to do on this amazing friday?

xx Nic (@NicholleZoe) 

Thursday, 22 November 2012

Product Review; Bye bye dry &damaged hair!

Hi beauties

As promised from the last post, I said I would do a product review regarding dry and damaged hair. I am not going to lie, I have only tested this product out for a week and a half and I am absolutely loving it, hence why I am doing a product review this fast because I have notice results in just 4 days! 
Sit back and enjoy reading! 

Product Name; Free &Free Damage Aid


This is the package it comes in, Can you see the clear plastic wrapper? no? okay... 


What does the product do; 

Basically, this is a treatment water which you spray it on your ends (hair). This product seals your ends and treat dry and damaged hair! 

Scent; 

I have to admit that the scent at first made me a little nausea. It has a very light floral scent to it that does not linger on your hair all day. It stays for about 10 minute then it disappears. 


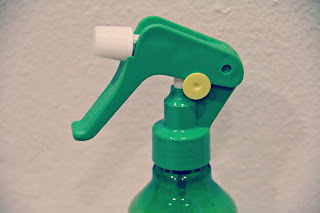
So this is how the bottle comes in when you take the plastic wrapper off. There are two different types to suit your hair type, if you have dry and damaged hair get the green bottle (as shown above), If you have colored hair then get the red one specifically for you hair! 

How to use?

- Spray it to your hair and ends about 10-15cm away. 
- Let it soak in. 
- Comb through
-Style as usual 

Bottle packaging &the way it sprays; 

I like the bottle packing quite a lot because it's light and easy to use, there's a reason why I like using this product (see picture below). The way it sprays out of the bottle is actually really good, because it sprays and comes out as a mist instead of spraying it and coming out like a water gun. Trust me, there are lots of products out there where you spray and it is as if I am playing with a watergun, leaving one patch of my hair wet and the other dry. 


Okay *refresh memory of yours* remember how I said I like using the product? well that's because if you look at the picture where there's a yellow circle, You can remove it and then you spray. If it's intact, you're not able to spray. 

Moving on with the price and where I got this product; 

Price; B$6.80 
Where I got this product; Supa Save. 

So this is a mini review on the product that I have tested out and I am still currently using it after my hair protein cream. This leaves my ends feeling less dry and frizzy, I spray this about 2 times on the same patch. Don't worry, it absorbs quite fast so don't worry that it'll leave your hair feeling damp. 

I hope you guys enjoyed this post and also found your miracle product for your hair! I'll be finishing the entire bottle before I purchase my new one!

Update: This blog will now not be solely based on hair care and skin care anymore, I have gravitated towards being a beauty blogger, I'll be doing makeup tips, product reviews as well! i hope you guys like the change!


Disclaimer; I am not affiliated with the brand mentioned above in this post, All opinions/comments are my own. Pictures are all mine, If you wish to take them please kindly tell me in the comment section below. 


Have an amazing day!
xx  Nic (@nichollezoe) 

Wednesday, 21 November 2012

Basic Haircare.

Hi Lovelies!

As promised I would post a hair care post today, so here's it is! Today's post is going to be about basic hair care! So keep reading on and let's just started!

Hair care tips;

1) Wet your hair thoroughly before shampoo-ing it, this minimizes breakage of hair.
2) After shampoo-ing, rinse your hair with COLD water. Rinsing with cold water will then seal all the goodness in your hair!
3) Towel-Dry your hair before blow drying your hair, this will cause it to not break that easily, also let your hair air dry for about 20 minutes before blowing it dry!
4) Comb your hair thoroughly when it's wet, so when you blow your hair this avoids any tangles and breakage.
5) If you have dull or lifeless hair, try cutting down cholesterol and fats!
6) Always condition your hair!
7) Never ever rub your hair dry because this will make it more frizzy, always dab it dry in between your towel.
8) Always wash your hair right after even if it's just with water after swimming. Chlorine can do major damage to your hair.
9) Never condition your roots because this will cause it to be more oily and greasy.
10) Always do a hair mask once-twice a week! If you haven't check my post; Click here

So I know this post may be a little shorter than what I have written the past few days, but nonetheless these are the basic hair tips I could give you in order to have healthier and silkier hair! I hope you enjoyed this post and stay tune for tomorrow's new post.

Tomorrow's post will be about a hair care product review that I have recently tested out for dry and damaged hair, so if you have dry and damaged hair then stay tuned!

Update: This blog will now not be solely based on hair care and skin care anymore, I have gravitated towards being a beauty blogger, I'll be doing makeup tips, product reviews as well! i hope you guys like the change!

Love you guys! :*
xx Nic (@nichollezoe)

Tuesday, 20 November 2012

Ways to get rid of acne/scars quickly.

Hi Beauties!

Ever wonder how to get rid of acne scars?  If you have acne scars on your face, that is because you have been either picking at it or have not been taking good care of it. Here's some of the remedies that would help you with your scars. There are thousands of post out there regarding acne scars but here are the top 3 I can give you guys!

Lemon Juice;
 Lemon juice have been very popular in the acne department. Take a lemon, squeeze out some juice then leave it on your skin for about 10-15 minutes. Lemon Juice have properties to lighten your skin and lighten your scars!


Face Mask
; Take a table spoon of yoghurt and oatmeal. Mix it with a teaspoon of lemon juice then mix it and apply to your face and neck (if necessary). After 15-20 minutes, rinse it off. This will help with your acne scars and make it fade.

Egg Whites;
I have tried this treatment before for my active breakouts, and if you suffer from active breakout this could be good for you.
Separate the egg yolk and egg white (you'll only need egg white) Apply a thin layer of the egg white on your scar/skin. Wait for about 10-15 minutes, till it's dry then rinse it off.
You can combine and add ingredients like; Oatmeal or even honey. Oatmeal and honey removes excess oil and avoids acne breakout.


If you have very dry skin, I wouldn't recommend you to try the egg white mask all over your face as this can be very drying to your skin. If you're a greaseball like I am (super oily skin-ed) then you can definitely go ahead with the method! be sure to follow up with a good toner and moisturizer!

Disclaimers; All pictures are not mine unless stated so!

I hope this post helps you guys on how to get rid of your acne/scars quickly! Tomorrow's post will be about hair care, so stay tuned!

Goodbye Acne, Hello perfect skin!

xx Nic (@nichollezoe)
 

Template by Suck my Lolly